Back to School Giveaway!


All of us here at All About 3rd Grade want to wish you a fantastic and successful back to school season!  Be sure to check out all of our Back to School posts here. Then, enter our giveaway for a chance to win one of three $20 Teachers Pay Teachers gift codes!  
Just enter using the Rafflecopter below:

Survival Cooking for Teachers who Hate Cooking


Topic #1 - Surviving Grocery Shopping and Making Multiple Meals with Chicken


Topic #2 - Making Three Meals from One Pork Loin


Topic #3 - Making and Freezing Lasagna - Making 6 Lasagnas from a Triple Recipe


Download the FREE recipe here:
https://drive.google.com/file/d/1TrW_8eqnNoItZ6dWQSmZBDOnu8zsFEMh/view?usp=sharing

For more teacher survival tips, follow me on Facebook and in my Teachers Pay Teachers store.


Fraction Fun!

Do you struggle with making fractions fun? I've put together a few activities and centers I like to do with my students-- read more about them below! **Please note that this post contains some affiliate links for Amazon**
So how does a fraction puzzle work? Pretty simple-- print, laminate, cut, and store! I tried to use both a shape AND number line representations on my puzzles-- that way kids have to use different skills we've covered during whole group. I love these fraction puzzles because students can put them together independently or with a partner! You could easily create your own puzzle pieces by using index cards (or better yet-- let the students create their own puzzles!)
My kids LOVED this game! It can be played in groups of 2-4. Rules are just like "Go Fish"-- however, students are trying to collect sets of 3 (fraction line, fraction picture, and fraction itself) to win! I have my kids set up a test divider to keep prying eyes off cards. You can also use file folders if you don't have any dividers. The great thing about this game is it can be played over and over-- and each time will be different! I copied my decks onto different colors of paper to help keep them separated. I am using Iris photo boxes to store the cards.
Looking to add some movement? Try fraction bowling! I bought this inflatable bowling set at Target last summer for $5! Students bowl for 3 rounds and record the number of pins knocked down as fractions. This sheet also has them practice by labeling/marking a number line, comparing fractions, and ordering fractions. I realize many people may not own this set-- but I did find a very adorable set of finger bowling games (12 sets for $12) on Amazon, and kids could easily play with a partner at their seats!

Click HERE or on the pic below to visit my TPT store and download the preview file (which contains 1 puzzle and 1 set of go fish cards for FREE)!
What are you favorite fraction activities and games? Feel free to share in the comments! Hope you have a lovely day!

Most Effective Teaching Tactics for Multiplication Mastery


Fact fluency – It’s a BIG deal.  Our state standards call for fact fluency and we all know how much easier it is for students who just “get it.”  So how do we support fact fluency in our classrooms and help those students who stumble.  Ugh.  The struggle is REAL!

Over my years of teaching I have learned a few tricks that make fact practice time fun, engaging, quick and help my struggling students see their improvement!  So they may never win if we player “Round the World” (aka – they may never be the fastest in their class at facts), but I can help them feel SUCCESSFUL!

Since I teach 3rd Grade, I will be sharing mostly about multiplication, but many of these ideas can be modified for other facts.

Differentiating Fact Fluency Practice - Great Intervention

Last year I learned about the free online fact practice site called XtraMath.  At first, I wasn’t convinced, but after sticking with it anyway, boy am I glad I did! It allowed my students to progress at their own pace and level, and now that I have done it for over half of the school year, I can see it has made a difference.  I had students who were just struggling with addition facts at the beginning of the year, but now they are much quicker and it has tremendously helped with multiplication (even though some of them are still working on addition or subtraction in January in XtraMath).  I often teach my students strategies such as, if you know 5x6=30, then you just add 6 more for 6x6.  For students who are fluent in addition, this is no problem, but for our strugglers, it is a HUGE deal - cue the counting fingers from 30 to 36.  Since I have used XtraMath everyday, I see less finger counting and more confident students.  This is also wonderful RTI (INTERVENTIONS) data.  You are intervening at their level and pace.  I do teach my students their multiplication facts whole class, but XtraMath allows me to continue supporting their intervention needs.  

Multiples with Music


If you can’t use YouTube in the classroom, I apologize in advance, because that is where this links to.  We can teach our students just about anything, but if it is set to music, they are much more likely to remember it.  Not too long ago, I was getting ready to introduce the multiples of 7 to my 3rd graders.  I told them about the fun multiples of 7 song we were going to learn, and I said “I bet even the 8th graders remember this song!”  Well of course inquiring minds want to know.  So we called down to the 8th grade (small school privileges) and guess what?  They rocked it!  My heart was beaming because even 5 years later, my former students remembered it!  Sooo, without further ado, here is the amazing video we rock out to with out pretend guitars and microphones, ever year!

Disappearing Skip Counting


Sooooo, I could explain this, buuuuut a video is so much better!

Once we learn a song or jingle like the song I linked to above, I will quickly write the numbers on the board and each time we sing the song, I will erase a few numbers.  This is especially helpful for visual learners, because even though the number gets erased, they can still "picture it in their mind."  


Fact Fluency Tents


I was so tired of copying flash card for my students, taking the time to cut them out and write the answers on back, only for them to lose some of the cards!  So, that is why I created fact fluency tents!  It's like having 50 flash cards on one page!  Yay!  How do I use them?  Almost everyday, we pair up right after recess and practice just like in the video here with the green x2 fact tent.  Once we get the routine down, it literally only takes us 5 minutes.  I also assign it as homework every night.  My students write their progress down on a fact tracker sheet and I check to see if they completed it as homework and have a parent leave their initials. 


You can grab a FREE sample of these fact fluency tents here.  >>>  Free Fact Fluency Tents

Excited about the fact fluency tents and want them all now?  >>>  Fact Fluency Tents Bundle
  (You can buy fact fluency tents separately.  Just look in the description on TpT for links.)


Growth Mindset


One of the BIGGEST changes I have made in the last 3 years is teaching "the power of yet."  So often, students feel like they fail when they can't beat the "fastest multiplier in the west."  I say that is bull-oney!  The BEST tactic I have ever instilled is NOT fastest or best; it is "I am not good at this YET, but I WILL be great!"  

I have my students track the number of facts that they finish in one minute each day so THEY can see THEIR OWN GROWTH!  At the end of the week (or when we are finishing up a fact), I allow my students to share their growth if they want to.  I am always amazed by how many of them share and how many really encourage each other with positive affirmations.  My students will share their growth with, "I started by finishing __#, and today I finished ____#."  For some students those numbers are 3 to 24 and for others it is 14 to 52.  Whatever the progress, I make sure and reply with a positive affirmation, and I love it when other students join in with their positive words.  


This is the FACT TRACKER SHEET I use for each fact.  You can snag it for free with the Free Fact Fluency Tents.  


Donut Math


I use donut math when my kids have the wiggles and we just need to get up out of our seat.  This is a fun team competition type of game that my friend Kim from Elementary Antics explained in a previous blog post here in All About 3rd Grade.  Check out the donut math post here with all the simple step by step directions!


Silly Fact Sayings


Some of the facts just need a silly saying in order to memorize them, so here are some ideas:

Skate x Skate = Slicky Floor, 8 x 8 = 64
I tell my students to imagine that they have ice skates on and they are making figure eights on the slick icy floor.

Four wheel drive when I am 16, 4 x 4 = 16
I do come from a rural school where lots of families have 4 wheel drive vehicles, plus you can get a drivers license in our state when you turn 16.  I am not sure if some states have changed the license age.

5, 6, 7, 8.... 56 = 7 x 8

6 x 8 is really great, 6 x 8 = 48

6 x 7 is stuck in glue, 6 x 7 = 42

3 x 7 is lots of fun, 3 x 7 = 21


Games and Centers

I am a fan of fun and hands-on!  If I can make it "click" with my students using activities rather than worksheets, I am all over it.

Multiplication and Division Bump


     My students often choose this as a free time Friday (if they have earned it) activity or an indoor recess game.  Yay!  Basically the students are playing against each other on a multiplication or division game board and trying to claim as many spots on the board before their opponent knocks them off.  They can claim spots on the board by correctly answering a math fact, but an opponent can also knock them off it they draw (or roll with dice) the same fact.  If you are interested in bump games, you can see several different bump versions here in my Teachers Pay Teachers store.  

 Multiplication and Division Sorts


These are my favorite!  Why do I love sorts?  My students can do this activity again and again, unlike worksheets that can only be done once.  I send sorts home as homework, use them in my centers, send them with anyone who may be working with my students for interventions, use them in my small math groups....... you get the picture.

Repetition is the key with multiplication and sorts allow you to have students repeat a sort again and again without having to reinvent the wheel.  You can easily make some sorts just using index cards and colorful markers.  If you are pressed for time, you can also get your students involved and have them help you make some sets or you can purchase some on TpT.  I have several sorts available because I am a huge fan of math sorts.  They are available in these bundles or you can check out the individual resources within the description.

3rd Grade Math Centers Year Round Bundle
3rd Grade Math Centers Winter Theme
3rd Grade Math Centers Spring Theme

 I hope that you can go back to school tomorrow with at least ONE NEW IDEA and you feel inspired to be able to help your struggling multipliers tackle the "POWER OF YET" for their multiplication facts.  You can do this!


Fun with SNOW in your Classroom

Having a snow day in your classroom is a great way to bring outside experiences inside! Even if you live somewhere where you don't have snow, it is fun to pretend!

I don't know about where you live, but I have seen many people's posts about having snow days! I live in Phoenix, and it has been in the 70s! Now I do enjoy the warm weather, but at the same time I think that I would enjoy having a snow day every now and then. As a way to make up for the fact that we don't miss school for school days I have brought snow days to my classroom! In this post you will find five ideas of things that you can do in your classroom to enjoy a snow day! This post does contain an Amazon affiliate link.


Having a fun craft is a great way to show your students how they are all unique and different. I enjoy this project because I give the students the gloves, hat and arms, but then they can create the rest of their snowman. They are able to add their own faces, scarves, buttons and they all turn out so cute! I used leftover Christmas wrapping paper to hang the display, with a cute poem from Adventures in a First Grade Jungle in the middle!


Another awesome hallways display is a snowman glyph! I love these because they again are personalized to each student, but allow them to show their creativity! Then you can have the students graph the results as well so they can show that they know how to read a glyph also. You can grab it FREE from TPT here.


During math centers my students get to build a snowman by answering various questions to gather parts of the snowman. I hang the different task cards around the classroom so they are able to get up and move around. Moving around is one of my favorite parts of any station, so that way they are not constantly sitting in their seats, but get to get their wiggles out while they are working on things!


Tying writing into your snow day is a great way to practice a procedural writing! Students can explain how they build a snowman in four easy steps! They can personalize this by saying what they would do to make their snowman unique or what they would add to their snowman. You can grab this awesome writing foldable from The Creative Classroom

Having a snowball fight in the classroom with these awesome snowballs from Amazon would be a great way to have some fun and get exercise during your snow day. You could use these to play dodge ball and it wouldn't hurt your students. Another snowball fight I played during math class was having students write a math problem on paper. Then we crumbled up the paper and they threw them across the classroom. They then answered the questions on their recording sheet and it was another way to practice their math facts. You could do this with any task cards or math concepts that you are reviewing at the time.

What are some things that you would do in your classroom to celebrate a snow day?! I would love to hear what else you would do!


States of Matter Books & Videos

Teaching about the states of matter is one of my favorite science topics!  There are so many fabulous ways to teach about solids, liquids, and gases!  I love all the different experiments and it's a concept that children interact with everyday of their lives.  I wanted to share some of the videos and books I use to teach these in my classroom.
States of Matter books and videos to teach about solids, liquids, and gases in an elementary classroom.


States of Matter Books


When it comes to books, there are a ton of books that are great for instructional purposes.  But I always try to find books for my classroom library that will be interesting enough for students to pick up on their own and read about science topics.  So here are my top 3 picks! 

1. What is the World Made Of: All About Solids, Liquids and Gases


States of Matter books and videos to teach about solids, liquids, and gases in an elementary classroom.

This book gives everyday examples of each state and even includes some simple activities for your students to explore the 3 states of matter!


2. Wile E. Coyote Experiments with States of Matter


States of Matter books and videos to teach about solids, liquids, and gases in an elementary classroom.

Wile E. Coyote uses the states of matter to try and catch the Road Runner! 


3. The Solid Truth About State of Matter with Max Axiom, Super Scientist


States of Matter books and videos to teach about solids, liquids, and gases in an elementary classroom.

This books is in a graphic novel format and a huge hit with my students!


States of Matter Videos


1. States of Matter for Kids


States of Matter books and videos to teach about solids, liquids, and gases in an elementary classroom.

This is a great explainer video with a little humor!

2. What's Matter?

States of Matter books and videos to teach about solids, liquids, and gases in an elementary classroom.

I'm a big fan of the Crash Course YouTube channel!  They are created more recently and include little snippets of pop culture which definitely appeal to kids!

3. I Wonder...Solid, Liquid, or Gas


States of Matter books and videos to teach about solids, liquids, and gases in an elementary classroom.

This video is set up as a game show and a great way to review the concepts you've taught!  I like showing this video when we are review for our test!

Want More?


Science Fair Projects Made Simple

Hello darlings!  Amy here from That Teaching Spark. Sometime in your life you or someone you loved has had to complete a.... wait for it.... Science Fair Project.  Gasp!  It can be the bane of your existence or it can be a joyful experience.  Can you even imagine?  LOL!


In all seriousness, I LOVE science, so teaching the Scientific Method and doing a class Science Fair Project is actually fun for me! No eye rolling please!  Talking parents down off a ledge and responding to parent whining and excuses... not so fun!  I get it.  I tell my students, "It's not hard.  It's just a lot of work!"  Especially when you wait until the week before it is due to even think of a topic.

In my school, all of third grade is required to complete a Science Fair Project.  To be proactive and to minimize the risk of parents wanting to gauge my eyes out, I created a Science Fair Journal that walks students through the process and gives them helpful reminders of the things I've been teaching them for weeks!! We also complete an entire Science Fair Project TOGETHER as a class and complete the journal TOGETHER.  This way I have modeled exactly what is expected and students already have experience with the process.


Question

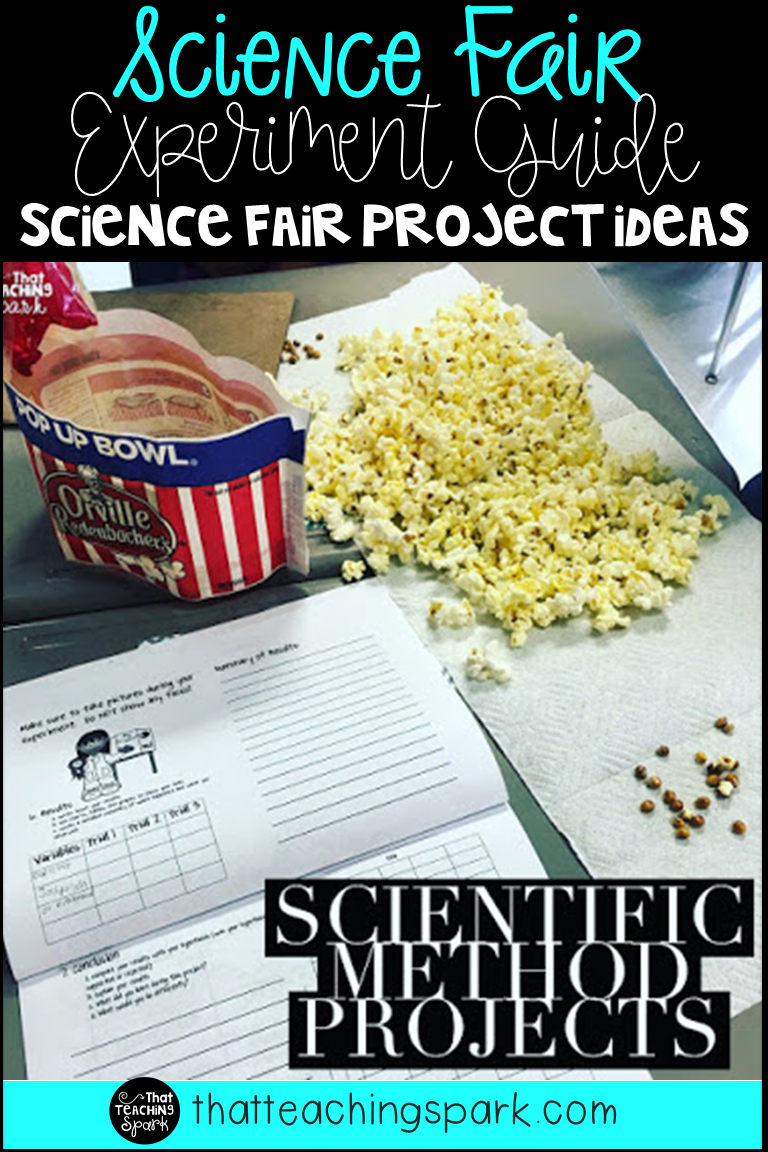
For the past two years I decided to research about popcorn.  Food + kids = ENGAGEMENT!  Last year our question was, "Which brand of popcorn will pop the most kernels?"  This year we did pretty much the same thing but instead of brands, we research types.  We were trying to see if it made a difference if the popcorn was super buttery or if it was plain with just salt. Our question was, "Which type of popcorn will pop the most kernels, sea salt, butter, or extra butter?"

Background and Hypothesis

For this experiment we had to use the same brand to keep all the variables the same except the popcorn type.  After researching at www.popcorn.org/Facts-Fun/What-Makes-Popcorn-Pop we created our Hypothesis.  "IF we microwave sea salt, butter, and extra butter popcorn for two minutes and thirty seconds, THEN the extra butter popcorn will pop the most kernels."


Materials 

The pictures I am showing are from last year's experiment with the different brands of popcorn, so don't let that confuse you.  The materials you will need are simple and depend of the experiment you choose.

Testing the brands:
(make sure the bags have the same amount-grams)
You will need a total of 3 bags for each brand for a total of 3 trials

microwave
Pop Secret Butter 34 grams
Jolly Time Butter 34 grams
Orville Redenbocher Butter 34 grams
paper towels

Testing the type:
 (make sure the bags have the same amount-grams)
You will need 3 bags for each type for  a total of 3 trials

microwave
Pop Secret Sea Salt 34 grams
Pop Secret Butter 34 grams
Pop Secret Extra Butter 34 grams
paper towels

Procedure

This was a very easy experiment because you basically just pop all the bags for 2:30 minutes each.  I divided my students into 3 large groups to act as Trial 1, Trial 2, and Trial 3 and laid paper towels on the table.  The students dumped one bag at a time onto the paper towels and counted all the unpopped kernels.  The logic here is that if all the bags have the same amount inside, then they should have just about the same amount of kernels.  If you want to get super technical, I'm sure there is a slight difference with every bag and you could count the popped and unpopped kernels and develop a ratio, but for our simple third grade experiment, we are sticking with just counting the unpopped kernels.

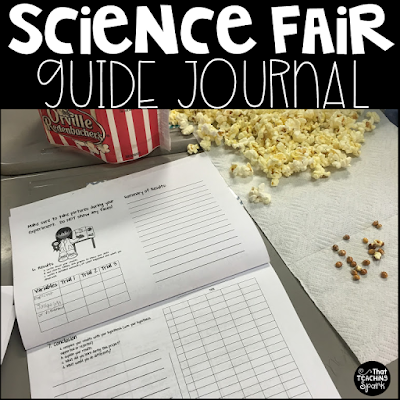
Students recorded their results for each bag and then we shared the results of each Trial as a class to record in our Science Fair Journal.


Results- Data/Analysis-Conclusion

After we recorded the results for the 3 trials, I showed them how to create a graph with a graph key so we could fit all 3 trials on one bar graph.  We summarized our results into paragraph form and then we wrote our conclusion.  In the conclusion it is important for students to state if their hypothesis was supported or rejected.  It is also very important for them to know that their hypothesis DOES NOT need to be correct.  Some kiddos think if their hypothesis was rejected that they did the experiment wrong.  The whole purpose of the experiment is to see what will really happen.  If you are wrong that is ok!  You should never do an experiment when you are 100% sure of the results.  What would be the point?  You learn nothing.  


I hope these ideas were helpful to you and you are one or two steps further away from the ledge!!  Science can be fun!

You can grab the blank journal we used here.  


Happy Sciencing!